Pages

Thursday, December 15, 2016

Step by Step Photography Light Box Using Stuff Already In Your House


As I venture further down the path of on-line selling, it has become apparent to me how critically important great photography is to product views and sales. I've been doing tons of research on tips and tricks to produce the best photos possible for my listings, and I've learned from many expert sellers and photographers that lighting is the most crucial piece of the puzzle.

People smarter and more experienced at this than I say that natural light is the absolute best to work with. A space that is bright, but not in direct sun provides a perfect amount of diffused light. Sounds simple, but as I tried to take photos at the exact perfect time of day to get the best shots and frequently failed (life's busy, right?), I knew I needed a way to get great lighting any time of day. I'm a night person, after all.

Luckily, there are about a million on-line tutorials on making a simple, easy photography light box at home, and I think I may have watched/read them all. After my research, I set about combining some of the best tips and methods I saw and now officially bring to you step-by-step instructions on making a simple, effective light box at home with (hopefully) things you already have. It only took me 45 minutes to make mine, and it does the trick nicely!

Step-by-step Guide To Making a photography Light Box:


1. Find a box. Choose a size that will work with the size of the items you plan to photograph. You want a good amount of space on all sides.

2. Cut off the flaps on all sides. I used a box cutter...


3. Use a plastic school ruler to trace a line around the perimeter of the box about 1" from the edge. A ruler is the perfect width, so just line it up with the edge of the side and trace away!


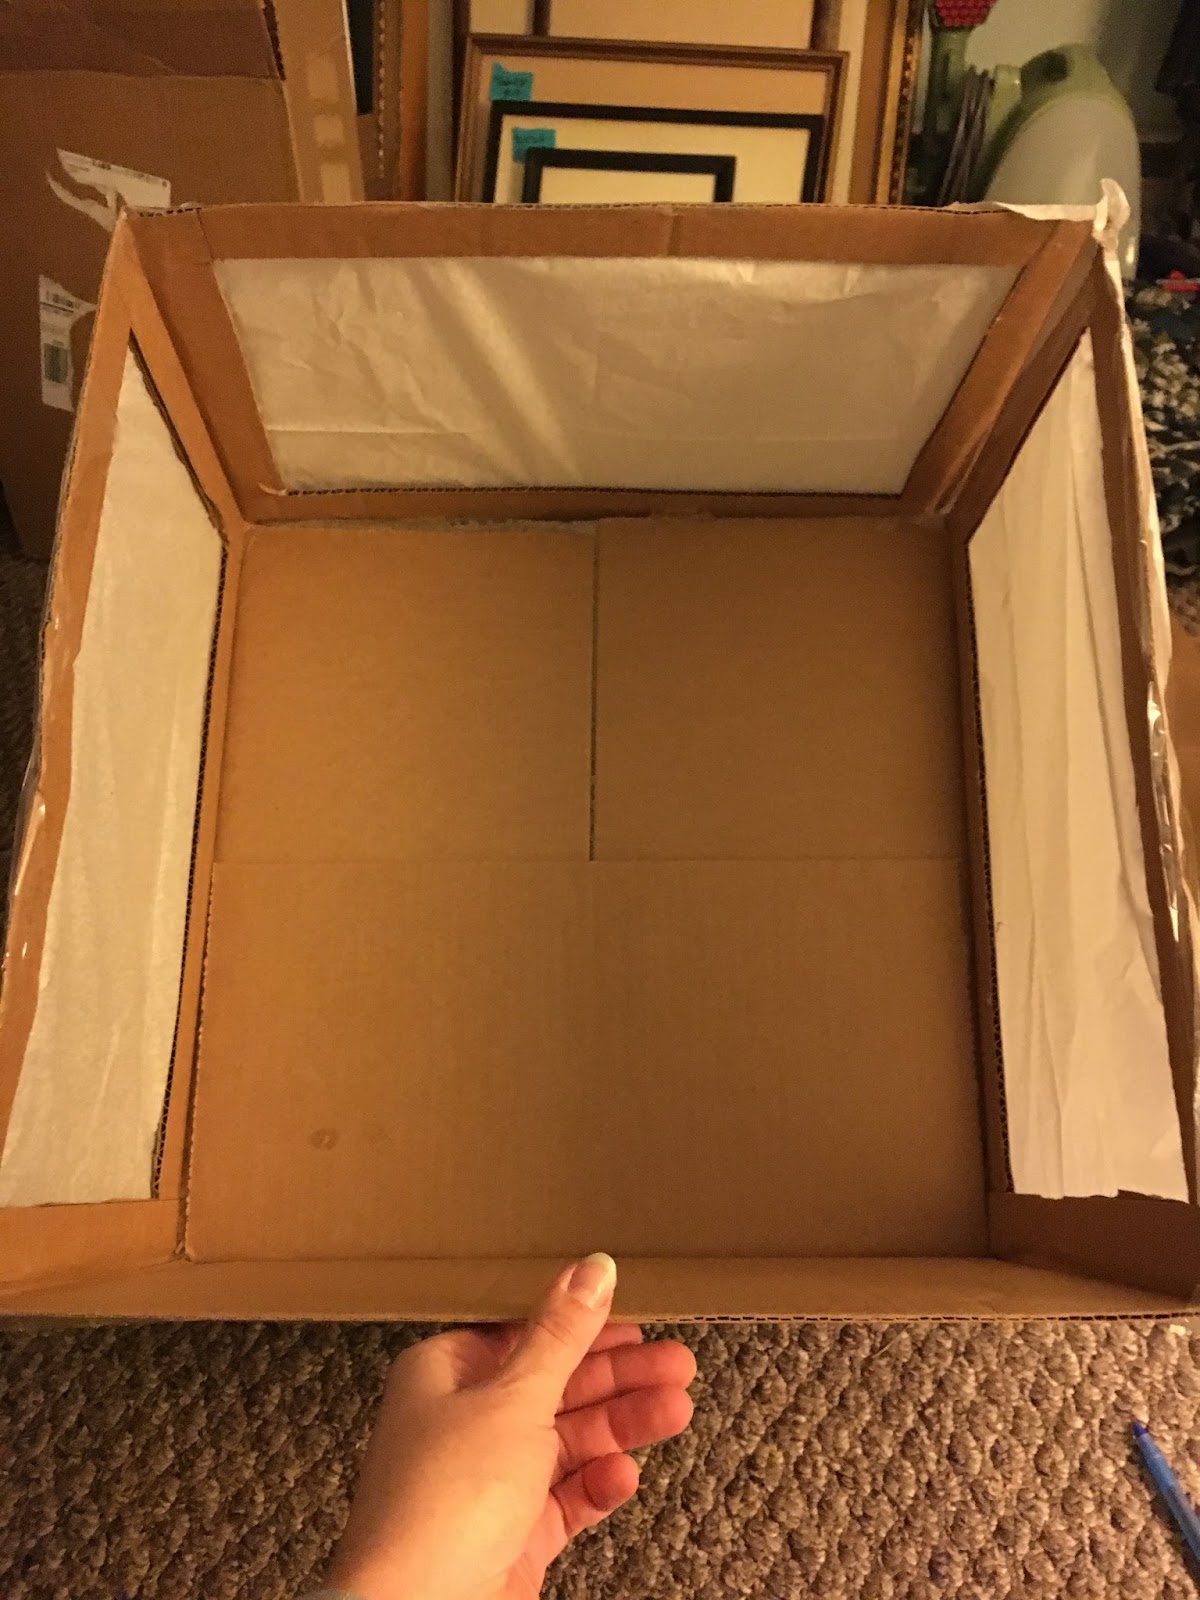
4. Once you have the perimeter traced, cut out the hole in the box. There is no need to be exact in your lines or cuts, so don't stress this step at all. Repeat on 3 sides of the box, making sure the side you leave in tact is the one you want to use as the "floor" of your light box. And be gentle. Baby hands. The box will easily flatten under pressure.


5. Once you have all 3 sides cut out, tape white tissue paper or thin white linen (like a cut up sheet) to the outside so that each hole is completely covered.


6. I decided to make the "roof" of my box openable, so I could drape fabric, etc over it to use as a back drop. To do this, simply cut along two of the box edges, making sure to leave either the left or right hand corner attached to use as a hinge.


7. And thats it! I know, super easy! You're not quite done yet though... Now you need to dig up some light sources. I just happen to have a desk lamp with one of those bendy necks, which is perfect for this. I also grabbed a flood light that you can clip on things from our basement and it worked like a charm as well! You can create different effects by playing with the angles the light shines into the box. I had two lights on each side and just one coming in from the top as seen below. You may also find that you need to add additional layers of paper or linen to diffuse the light to the desired effect.


You can use that awesome opening roof to drape some fabric over the back and get a cool backdrop and floor. I used a cream colored top sheet in the below pics. I found that the single layer of tissue paper that I used was too thin, so I used the sheet to cover the holes and clipped it in place. Problem solved!


I used a simple small glass bottle to test out different backgrounds and lighting sources, but the options are endless. I'm going to be raiding the fabric clearance bin at the craft store to find some fun colors and also plan to get some poster board as well. Paper makes an excellent, clean background but remember not to crease or fold the paper that is behind the object if you want a seamless background.


And that, my friends, is a wrap! I literally just made this tonight but can't wait to get crazy with it! These are simple shots using my phone to demonstrate, so imagine how far a good camera and some cool props and backgrounds would go. Check out my Etsy store for awesome new items and pictures using  this cool new toy!


Wednesday, November 16, 2016

The Art of Upcycling


One thing I just can't get enough of is finding unique ways to repurpose old "left-overs". Ugly, unwanted pieces that are just screaming for someone to make them pretty again.


Here's one of my most recent projects to get your creative juices flowing!! And if you're not feeling a little elbow grease, you can find this in my Etsy Shop.


 So I picked this up this old dirty drawer at a flea market for $5.00. The dude selling it told me that it came from a primitive hutch that he no longer had. I knew it was special just by the character. The patina and rusty hardware called to me. When I got it home (and snapped these shots) I realized that the separators built into the drawer, likely for silverware or other utensils, would serve really well as small shelves if the piece hung. And so I began...


So I mentioned this thing was dirty, right? Filthy is a better term. My first task was to clean it, and make sure there were no little surprises waiting for me under the layer of funk. Luckily, all good! With the piece clean, I set about to paint the interior of the drawer. I had a nice rich red in mind and knew I had some in my stash, as seen below. I'm thinking it's exactly the look I'm going for...


Until I lay on a coat and let it dry. Oh the horror! Not looking too much like that nice deep red I had in mind. At this point, I had relatively limited options. When I say the piece is primitive, I mean this drawer has got to be at least 100 years old. At least. No way it was going to stand up to sanding and repainting without ruining some of it's natural charm. So I decided to try an antiquing technique using stain that I hoped would result in a rustic feel and darken up the pink party drastically!


Before starting to apply stain to the piece, I lightly sanded the edges and corners to expose a little wood at places that naturally would see a lot of wear. Make sure the piece is dust free and dry before you start to apply stain. I recommend applying the stain with one cloth and having a clean, dry "wiping" cloth nearby. Using a brush to apply the stain and wiping away with a cloth is an option too, but I personally hate cleaning brushes with oil-based stain on it, so I go with the lazy mans method. Use cloths and throw them away when done. Disposable gloves are also really helpful at this step if you have some handy. 

I started by dipping a corner of the cloth into the stain (Minwax Jacobean) and applying it to the interior of the drawer. When using this technique, just like staining bare wood, you want to let it sit and then wipe excess stain away with a dry, clean cloth. The longer you let it sit, the darker the effect. I started with one small section at a time, wiping away stain almost immediately to test the effect. 


Once I got a feel for the time the stain needed to sit (5 minutes in this case), I completed the process. If you are attempting this technique for the first time, I can't emphasize enough to TEST first before going to town on your project. The effect can differ drastically depending on the color of stain and paint and the finish of paint you're applying it over (flat, satin, etc). 

You can really give your piece some additional character by leaving more stain in the corners and recessed areas, as seen below. 


Once I had the staining completed with the desired antiquing effect, I let it dry for a full week (stain takes forever, especially applied this way) and the finished it with a coat of sealer (Minwax Polycrylic).


I wanted to make sure any items stored on my new little shelf wouldn't hit the floor if somehow bumped, so I decided to add wooden slats across the front. I cut to size from some scrap wood we had and sanded and stained the slats with the same Jacobean stain. Once they were attached, I added a picture hook to the back and Viola! 


I am so thrilled with the way this came out! It's a versatile little shelf that generates a lot of conversation and I can guarantee is one of a kind! 
Like this project? Follow my blog to see more how-to's and tips on upcycling and more!

Monday, November 14, 2016

Adventures Of a DIY Wanderer: OldSchool Upcycles - My New Etsy Shop

Adventures Of a DIY Wanderer: OldSchool Upcycles - My New Etsy Shop:     OldSchool Upcycles Etsy Shop Hey everyone! It's been too long since I posted - I've been crazy busy (who isn't) and ...

OldSchool Upcycles - My New Etsy Shop


Hey everyone! It's been too long since I posted - I've been crazy busy (who isn't) and have had a bit of a twilight zone vibe going on since last week's election. But what better therapy than some good old fashion manual labor. And I've been doing a lot of it! So what better way to lighten the stockpile and share the love with the world? An Etsy Shop! So far, I have a few upcycled items listed and some super cool vintage magazine art and more is on the way! Check it out and follow so you're the first to see new listings. And don't forget to follow my blog to learn how to embark on some of this DIY awesomeness at home.

Sunday, September 18, 2016

Awesome Handmade Christmas Gift Idea!

As fall starts to set in, I start thinking about Christmas (just thinking), and it reminds me of one of the coolest handmade gifts I've ever received. It's not an expensive gift to make, or one which requires great skill, but the result communicates such thoughtfulness that the effort is more than worth it.
A friend of ours saved the 'save the date' cards, invitation, and envelopes from our wedding and artfully cut them into strips, wrapped the strips around a pencil to curl and put them in this ornament. We had decided not to provide the traditional favors for each of our guests and instead made a donation to St. Jude's Hospital, and left St. Jude's bracelets and a note for guests and she even saved the bracelet to use for the  hook. 

Just a little bit of planning and a few dollars and she made us an amazing gift. I smile whenever I see it. 

Saturday, September 17, 2016

Decoupage Furniture


I have a slight obsession with all things antique paper. Old newspapers, magazines, books and posters of all kinds just make me incredibly happy!! But I have a tendency to buy these things on the cheap at flea markets, library book sales, and tag sales by the car load. Then I riffle through them once and they end up in a less than glorious pile in my office. 

So it is time to make something with all this awesomeness.  I happened to acquire a book on decoupage during one of my many book buying sprees and right at the time I was deciding what my first decoupage project would be, my Pops called me and asked me if wanted a couple of end tables he was planning to chuck. Aha! Perfect! 

I studied technique in the only acceptable way I know- YouTube. Thanks to the plethora of people out there that have made detailed videos of their decoupage adventures. Follow that up with a Home Depot and Hobby Lobby shopping spree and I was ready to rock!
A before shot of the tables- I used painters tape and newspaper to cover the areas I planned to decoupage so I could sand and paint the pieces first. You want to apply your paper onto an unpainted (or painted and sanded) surface. The more texture, the better it'll stick! 
Another before- Just a beat up table you'd likely see on the side of the road. 
After all, I myself rescued these old tables from the trash.
This is the top before I taped it for painting- It had this beat up leather topper that had certainly seen better days! I sanded it and decoupaged right over it.

So then I sanded lightly, cleaned those puppies up and gave them 2 coats of chalk black paint. Then 2 coats of an eggshell interior white I had laying around, and This is where we were...
Looking better already! 
I bought a huge pack of foam brushes at the craft store so I could use and abuse 'em and them throw them away. Especially important for decoupage, you don't wanna be trying to clean glue out of good brushes. 
The plan was to sand down some spots to expose the black underneath giving the tables an antiqued finish.


But, Lex decided these tables were for her, so we gave it yet another coat of chalk black to match her room. Flip mode style.
And Voila!

Top of one table- All images on both were clipped from a 1943 Life Magazine
The other top- My fav. Center image is from one of Marilyn Monroe's first professional auditions- She's 23 in the pic. 
I even did the bottom shelf and sides and back panels, almost exclusively in ads from the Life Mag. 

Back side
Don't forget the inside and sides of the drawers- Adds some unexpected color!
And the finish!! They say the decoupage glue (I used Mod Podge) is also a sealer and finishing coat. But when you have a teenager, you can expect that anything left in their possession is getting a beating, so I added 3 coats of Minwax polycrylic sealer (remember Polyurethane will yellow over time) to give it a super durable sheen that should stay crystal clear for ages. :)


I love the way they turned out! On to the next!